Feature flags: Helps devs test on production (kinda) with AWS load balancer
The devs were going to do it regardless, this just makes it legal.

In recent times - and by recent times, I mean last month - we’ve had some incidents in the development world (Crowdstrike), where a feature has been launched without proper testing or with incomplete testing which has had some unforeseen consequences (like shutting down every flight in the world).
Testing is important, but it is merely one layer in a multi-layered approach that should be applied to applications on scale to ensure that something like Crowdstrike never happens. The layer we’re going to talk about today is feature flags. Now I have gone into even greater detail on the topic in my book (insert shameless plug here), but in this blog we can look at it through the eyes of a service that I initially learned the technique through: AWS Load Balancer.
What is a load balancer?
A load balancer essentially distributes web traffic between multiple different targets based on certain criterion. It could, for example, be the connection protocol (HTTP, HTTPS), location, cookies and many other factors. The motives behind it can be different as well (like with out case of feature flags) but the primary goal is the proper distribution of web traffic.
I discovered load balancer when I was a developer and DevOps guy as just a tool to be used to make sure your servers receive a balanced amount of traffic and that no server is overloaded. But, I discovered all of the other applications as well, including testing ones like A/B testing. However, the use of feature flags was the thing that really caught my eye. It was so simple, yet so ingenious, really.
Feature flags with a load balancer
I’ll just start by stating that this is probably the simplest way to create a feature flag, and probably not the most efficient. But, I wanted to showcase it, because it is a good way to get to know how feature flags operate. Here’s the scenario:
There are two different forms of an application: one is for secure usage (HTTPS) and another is for non-secure usage (HTTP).
These applications must redirect to different target groups based on the HTTP and HTTPS criteria.
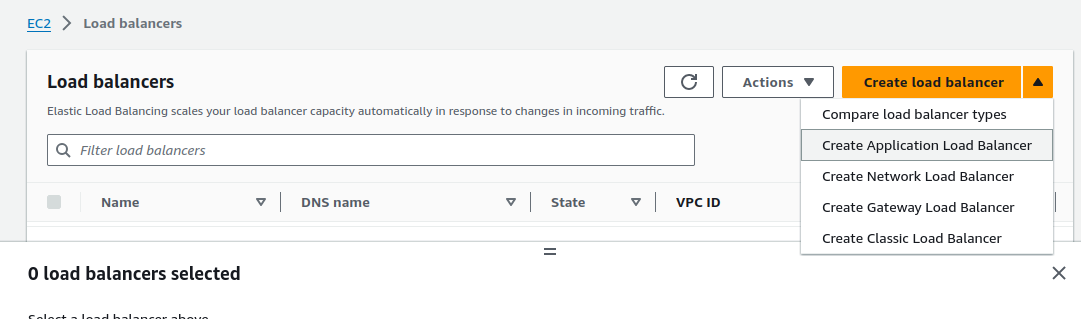
In the AWS Console, go to AWS Load Balancer and from the Create Load Balancer button dropdown and select Application Load Balancer.
Give the load balancer a name, and keep all the remaining settings the same until Listeners and routing. You’ll need two different target groups to route to. They can be empty.
The default has an HTTP route with an open 80 port which we can configure to have a target group like so:
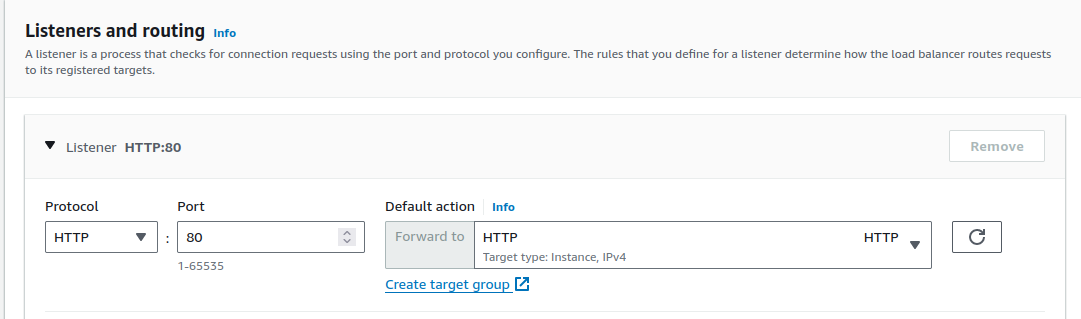
Then you can add the HTTPS listener and the appropriate target group.

Keep everything else the same, they’re important, but not needed for this little exercise. Click the final button to create the load balancer.
Conclusion
The final load balancer will now route users based on the protocol they use to access the endpoint. You can see a resource map that looks something like this under Resource Map → Overview:
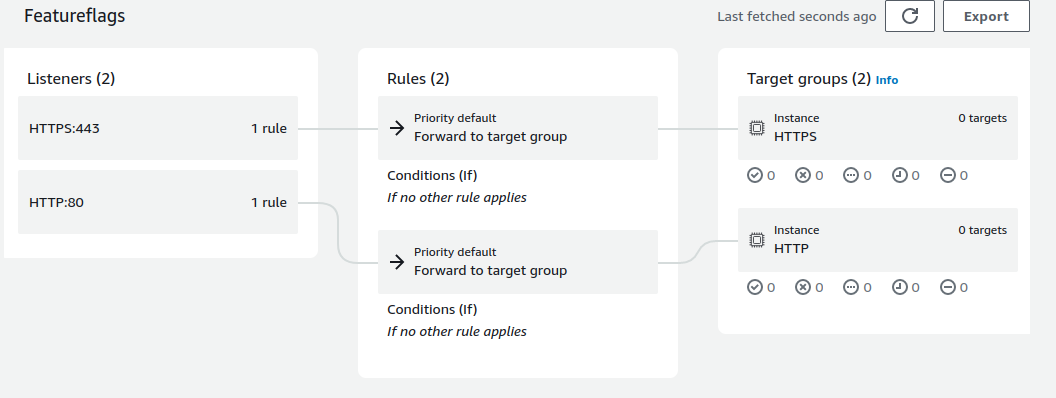
It shows diagrammatically the routing of the resources based on protocols. And that’s what feature flags are. Really, its that simple. But it is quite effective. Try it out.